Netscape Mail
Adding
a Pop Email account:
 The
difference between private pop mail accounts, and simply using the
"Catchall" method:
The
difference between private pop mail accounts, and simply using the
"Catchall" method:
There are two kinds of email addresses you can use, starting with
the "catch all" method:
With the catch all method, you don't have to worry about setting
up individual pop mail accounts. Simply set your email client to
your "default" email address (displayed in C-Panel), and
"all" email sent to anything@yourdomain.com
will land in this box, or whatever you've set your default address
to. This is an easy way to catch all email sent to your domain.
In your Email client, feel free to configure
multiple outgoing accounts at many-different-names@yourdomain.com.
It really doesn't matter, as everything@yourdomain.com
will land in the default account. Therefore, you would
configure all of your email accounts with the "same" Username
and Password as your "Default domain Email Account."
EXAMPLE: Let's say you want to receive
mail from support@yourdomain.com
and mark@yourdomain.com.
If both of these addresses are the ones you'll be using, then the
only thing that changes is the address - the Username and Password
is "always" the same.
The pop email account method:
In this case, you configure a "private"
pop email account for one or many users who will be receiving and
sending email from your domain. Once an email address is configured
as a pop mail account, it operates privately and independently from
your main standard/default mail system. Any mail sent to a private
pop mail account "can only be received" by logging into
that account with the separate username and password you have assigned
it.
Your default "catch all" account
will not intercept any mail being sent to a pop mail account, which
is what makes it 'private'. Pop 3 accounts are useful if there are
a number of people (for example employees) who would each need a
private email account.
This way, everyone at your company can utilize private email. The
default email address plays a slightly different role in this case:
If a sender uses the 'wrong' Email name or syntax, then that message
would bounce to your "default catch all" account, and
at which time, you could probably figure our who the sender was
trying to contact. They do however, have to at least send it to
your correct domain name, (I'd', oops@yourdomain.com.).
This would end up in your "default" mailbox.
How to configure
a pop mail account:
1. Login to C-Panel
2. Select "Add/Remove accounts"
3. Select "Add Account"
4. Enter an email name
5. Select "Create"
Just enter a name, (the @yourdomain
part is added automatically)
That's it, done! Your private pop 3 email
account is now ready for use. If you're a little lost on how to
manually configure an email account into your mail reader, please
see the detailed tutorials on how to configure Outlook and Netscape
mail readers.
SPECIAL
NOTE!
If you've enabled Sub-Domains, you'll
observe a duplicate email account appearing, which corresponds to
each sub-domain you've added. Please ignore these duplicate
addresses for the time being. This is a new feature under
development and will soon enable the ability to configure email
accounts for your sub-domains. For example, if you configured support.yourdomain.com,
then you'll be able to use the address tom@support.yourdomain.com.
For the time being, please configure
email address's that correspond to your "regular"
domain, and just ignore the sub-domain duplicates. ALSO:
Any duplicate sub-domain email address's you see appearing in your
pop mail setup configuration "DO NOT" count towards your
allocated number of pop mail boxes we've provided. In short,
just ignore them for now :-)

Setting
Your Default Email Address:
 It
appears pretty simple, but read through this documentation, as this
controls much more that you'd expect. As mentioned in the
previous chapter, your "default email address" is the
one, which can be used as a "catch all", or in other words,
to "catch all mail", which is addressed to anything@yourdomain.com.
Using a catch all can be a blessing and sometimes a curse.
It
appears pretty simple, but read through this documentation, as this
controls much more that you'd expect. As mentioned in the
previous chapter, your "default email address" is the
one, which can be used as a "catch all", or in other words,
to "catch all mail", which is addressed to anything@yourdomain.com.
Using a catch all can be a blessing and sometimes a curse.
The "catch all" is excellent
if you have a high frequency of people whom mistype your email address,
as these addresses (even though mistyped), will simply be bounced
to your "catch all" or "default" email account.
That is, providing they at least managed to spell your domain name
properly :)
If you're not planning on using multiple
"private email boxes", then you can keep life very simple
- just configure the default email address in your mail reader and
leave it at that. This way, you'll receive everything sent
to your domain. There are indeed pro's and con's to this method,
which will be discussed in this tutorial.
Setting your default/catch all email
account:
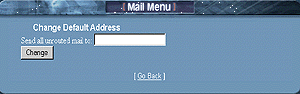
Note: By default,
or until you change it, the default email address will be the same
as your "login name."
1. Login to C-Panel
2. Select "Default Address"
3. Select "Set Default Email Address"
4. Enter a desired default email address
Just enter a name, (the @yourdomain
part is added automatically)
Select "Change"
and you'll see a confirmation box, which displays your new default
email address. That's it- done!
Remember:
In order to receive mail, which finds its way into your
"Default Mailbox", you must configure the default address
in your mail reader. If you don't, then all mail, which bounces
to this address will sit on the server unread. This is easy
to do in Outlook Express, as it allows you to configure and monitor
multiple email accounts. Email readers such as Netscape on
the other hand, are limited to "one" email account. Actually,
you could reconfigure your mail reader to check your default email
box every few days, but who wants to be bothered with that trouble?
We suggest using an email reader, which allows you to configure
multiple email accounts.
The Webmail
Alternative: You can also check your default email
account, or another other mail account by logging into it through
the "WebMail" interface. Simply select the "WebMail"
icon at the bottom of C-panel, and log in to it using your "Main
Account" Username and Password. This will allow
to to check your default email box, as well as other mailboxes without
having to configure them in your mail reader. In fact, using
any pop accounts "Username and Password" will log you
into that particular account through the "WebMail" interface.
The downside of enabling "Catch
All":
Problems can sometimes arise when Spammers or junk mailers use this
feature as a means to pump their trash into your mailbox. As long
as the "catch all" is enabled, then all they must do is
send to whatever@yourdomain.com
and it will reach you.
On the other hand, if you're using "specific
pop email accounts", you could opt to disable the "catch
all", which would mean that "only visitors or associates
who you've given a specific address to" can send mail to a
particular email account on your domain.
In this case, everything else, (that
you have not configured as a pop mail account) is bounced back to
the sender. In our opinion, we suggest leaving your "catch
all" enabled for the time being. If Spammers begin sending
random junk messages using anything@yourdomain.com,
then you can disable your "catch all" feature.
Disabling
your "Catch All Feature"
Instead of entering a (syntax legal name), use illegal syntax, which
will effectively disable your email "catch all." For example,
using characters, which are known as 'illegal' to the email system
such as (>>>????) will work just fine.
These are characters, which cannot be used in an email address,
which in effect, will render the "Catch All" feature useless.
Go to your "change default email address" and add something
like the above as default name.
What happens
now?
When Spammy or Jimmy junk mailer attempts to use a random email
address to Spam you, it will be bounced back to them. That is, unless
they happen to get a hold of one of your "legitimate pop email
account names", in which case, you'd have a different problem
on your hands. Yes, you could either deal with it, or change the
address.
Here is what now happens to a sender
using anything@yourdomain.com :
This is what the sender would receive. Please note that a classic,
but annoying junk mail example is being used here:
This message was created automatically by
mail delivery software (Exim).
A message that you sent has not yet been delivered to one or more
of its
recipients after more than 24 hours on the queue on yourdomain.com.
The message identifier is: 14m7gv-0007gl-00
The date of the message is: Mon, 04 June 2001 01:23:02 -0400
The subject of the message is: MAKE
MILLIONS FAST!
The address to which the message has not yet been delivered is:
anything@yourdomain.com
Delay reason: error in alias file /etc/valiases/anything@yourdomain.com:
missing or malformed local part (expected word or "<")
in "******>>>" (Bad
email syntax)
No action is required on your part. Delivery attempts will continue
for
some time, and this warning may be repeated at intervals if the
message
remains undelivered. Eventually the mail delivery software will
give up,
and when that happens, the message will be returned to you.
So what actually happened here?
When the "Catch All" email address (******>>>@yourdomain.com),
attempted to process an incoming message from anything@yourdomain.com,
and then forward the (junk message in this case) to the "catch
all/Default" email address, it freaked out, and said forget
it!! The default email address was set to ******>>>
in this case, which is clearly an email address using "illegal
characters", so the sending process was aborted. Therefore,
the mail system bounced back the above error message to the sender.
There are numerous tricks and special recipes you can 'manually'
write into the Unix email system for doing essentially the same
thing, however through C-Panel, this would certainly seem the easiest
way of accomplishing the task.
Configuring
Email Auto Responders
What is
an Email Auto Responder?
 Email
auto responders will automatically send a customized auto response
(that you compose) to any visitor whom emails the address configured
with one. More specifically, automated responses are sometimes used
to send additional information about your service or product by
having a visitor email something like moreinfo@yourdomain.com.
In most other cases, they are used to send a 'courtesy reply' to
anyone whom sends a query to your companies main email address.
When visitors email this address, they receive a response such as:
Thanks for contacting our company! Someone will be returning
a response to your question soon. If you require immediate assistance,
please call 555-222-1212. Thanks!), and so forth.
Email
auto responders will automatically send a customized auto response
(that you compose) to any visitor whom emails the address configured
with one. More specifically, automated responses are sometimes used
to send additional information about your service or product by
having a visitor email something like moreinfo@yourdomain.com.
In most other cases, they are used to send a 'courtesy reply' to
anyone whom sends a query to your companies main email address.
When visitors email this address, they receive a response such as:
Thanks for contacting our company! Someone will be returning
a response to your question soon. If you require immediate assistance,
please call 555-222-1212. Thanks!), and so forth.
There are two types of Auto Responders:
The silent Auto Responder:
In this case, you configure the responder to send the desired information
when it's emailed, however you 'do not' receive
copies of the inquiries that people originally sent. This
method is typically used if you have a product and want people
to email an address for additional information on it. You
simply tell them to email moreinfo@yourdomain.com,
and they receive additional information on it. Again, you
'will not' receive receipts of the visitors emailing the auto responder.
If you want to do this, please read the next paragraph.
The Auto Responder that sends you
the original inquiry:
In this case, the auto responder is setup to work with a (currently
configured pop email account). Now, the sender receives
your automated response, and you receive their 'original inquiry'.
How to setup an Auto Responder:
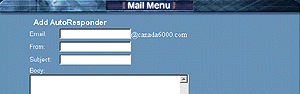
1. login to C-panel
2. Select "Auto Responders"
3. Select "Add Auto Responder"
4. Enter the "Email Address" to
send the auto response
5. Enter a "From" name, (for
example, my company)
6. Enter a "Subject", (for example, thank you)
7. Enter your message in the "Body"
area
Select "Create"
and that's it! Your auto responder is now online. To test
it, email its address and see if you receive the auto response.
If you've configured it to an existing pop mail account, you should
receive 2 responses. The first, which is your inquiry, (that you
just sent to yourself), and the second, which will be the automated
response.
Remember! If you want
to receive the "Incoming Inquiries" in addition to sending
the automated response, then add an email address, which is "already"
configured as a "pop email account." If you "do
not" wish to receive the original incoming inquiry, then simply
enter a name, which "Is Not" configured as one of your
existing pop mail accounts.
If at anytime you want to update, edit, or delete an auto response,
simply go back into "Auto responders" and you'll see the
current responders configured, as well as options beside each of
them to change or delete.
Blocking
Unwanted Email Messages:

From
time to time, you may experience either a junk mailer or some other
menacing individual whom keeps sending you annoying email messages.
C-Panel has a built in feature, which allows you to block these
email messages in a multitude of different ways. You can block them
by:
- Sender
- Subject
- Message Header
- Message Body
Of course, if all you want to do is block one specific email address,
then you don't have to worry about getting fancy with it - just
enter the email address to be blocked, and that's it, done!
How to use the block email function:
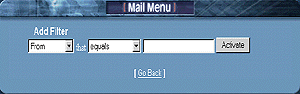
1. Login to C-Panel
2. Select "Block an Email"
3. Select "Add Filter"
If all you want to do is block a single
email address, then simply leave the "current default setting"
as is, and enter in the email address to be blocked. For example,
annoying-nolife@nothingbettertodo.com
Click "Add Filter", and that's
it done!
When you click "Back" or login to this feature next time,
you'll see the list of email address's, and or expressions you've
blocked. Beside each one of them will be a "Delete" option,
so that you can remove the block from your account at a future time.
NOTE: When you block an email address, or some
other keyword, this filtering will be enabled on "All Email
Accounts" within your domain.
Advanced Blocking:
For those of who whom experience frequent problems with junk email
messages, you'll be please to see this option provides a broad range
of blocking options. Instead of having us try to explain every last
one of them here, this is a feature you'll really want to experiment
with yourself.
Doing so, will allow you to become familiar
with the ways that email can be blocked, and will also help you
with customizing a recipe that works best for your domain. Play
around with the settings, and try to block words, or phrases based
on the From Name, Subject, or Message Body Text. Now, send an email
to your account and see if the terms and criteria you selected are
providing the filtering you want.
It may take a little time to master, but it's fun, and a great way
to broaden your abilities on web site administration. FINAL
NOTE: If you're totally new to email blocking, and wish
to explore its full potential, we highly suggest you test it before
launching your site. This way, you don't have to worry about accidentally
disrupting email for your entire domain.
Hint: Unless you're
100% sure of what a setting will do, always delete it when you're
finished, or until you have time to run a series of tests on it.
You want to ensure it's blocking what it's supposed to, and not
legitimate email messages!
A big junk mail problem:
If you're experiencing a high volume of junk mail, then there's
a good possibility Spammers are taking advantage of your "catch
all" option. To disable this, please see our tutorial on "Default
Email Address."
Email
Forwarding:

Email forwarding is a feature, which
forwards an email that originated from your domain, to another email
address. The forwarding address can be another email address within
'your domain', or to an 'external email' address, (for example to
your home ISP email account). There are two types of email forwarding:
Forward silently to another address:
In this case, the email address from your domain (setup for forwarding)
will divert all messages to the forwarding address you've selected,
and without sending you a copy of the original message. For example,
you@yourdomain.com will
automatically forward all messages to you@mindspring.com.
Pretty straight forward. (no pun intended).
Forward to another address, but also
send you the "original inquiry":
This is the method most commonly used. For example, you have two
other partners who wish to receive all incoming inquiries to the
company. Perhaps you're the one who responds to them, but your counterparts
would like copies of the incoming activity as well. The method for
accomplishing this is pretty well the same as above, except in this
case you would configure one of your "existing pop email accounts",
as that is how you'd receive a copy of the original incoming message.
Example: When General@company.com
(your companies main address) is mailed, you would typically be
the only one to receive the response, however if you've configured
forwards for your two counterparts (Bob and Mary), then bob@doodles.com
and mary@yourdomain.com
could also receive a copy of the incoming messages.
How to setup a mail forward:

1. Login to C-Panel
2. Select "Forwarders"
3. Enter a configured pop email account
name if you want to receive original inquiries. (Enter a none
configured email address if you do not)
4. Enter the email address you want
it to relay a copy of the message to
5. Select "Add Forward"
All messages will now
be forwarded to the forwarding address, and with a copy sent to
you
Need to Forward
to more than one person?
Simply repeat the above process using
the same address you've setup as the forward, and enter the additional
recipients you would like to send a copy of the message to.
All email forwards will be listed in your "Email Forwarder"
administrator. You can delete forwards when you no longer require
them,
Testing
your forward.
If you want to test your new mail forward, it's recommended that
the email account you're testing from "is not" one of
the accounts you're using in conjunction with the forwarder you've
just setup. For example, if you've configured harry@yourdomain.com
to forward copies to bob@doodles.com
and Mary@yourdomain.com,
then send a test message from an email address, other than one of
the addresses you've just setup, otherwise it can somewhat confusing
in figuring out which message was coming from the actual forward,
and which was the original sent from you.
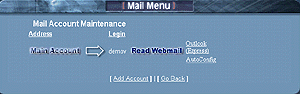
Accessing
your mail through the web based interface
C-Panel extends the versatility
of its email system by allowing you to access any one of your email
accounts through its own web mail interface. You have the choice
of accessing all mail through the web, or any of your private pop
email accounts. Gone are the days of having to create several email
accounts on various free html based mail systems, as now you have
your own, which operates from "your account."
Accessing your mail through the web
mail interface:
1. Login to C-Panel
2. Select "Add Remove Accounts"
Beside the email account
you wish to access, Select the "Read
WebMail" button. A username and password prompt will
appear, and are the same as the username and password you created
with that particular account. NOTE: Remember to use the "full'
email address as the account login name for the account you're
accessing.
The first screen you'll see:
If it's the first time you're accessing this email account through
WebMail, a setup screen appears. Actually, all this really does
is display how you'll be identifying yourself in email messages.
Everything is pretty much the same as what you setup the "original
pop mail account" with, however check it closely and make sure
everything is appearing as you want it.
Does everything look correct?
If so, then click "Save" and a dialog box pops up, which
confirms your settings as being saved successfully. Click "Continue"
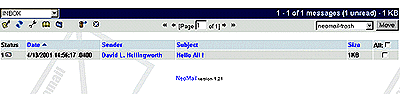
and you'll be taken to your WebMail inbox. To the top left of the
screen, you'll observe the following icons. Clicking on any
one of them will do the following.
Notes:
 |
Compose a new message |
 |
Refresh the screen |
 |
View user preferences |
 |
Open address book |
 |
View or add new folders |
 |
Empty your trash folder |
To delete or move a message, select the
small box beside it. Select where you which to place it using
the drop down menu (top right of screen), then click "Move".
- Open address
book, allows you to add and edit email address's . You can
also export your Outlook or Netscape Address
Book, which equips your account with all the email address's
you currently use.